Latest posts by chriscauley

Jan 29, 2015
by chriscauley
Anything can be solved with general artificial intelligence and hope.
read more >

May 14, 2014
by chriscauley
At the 17th recreational computer programming meetup, Stephen talked more on simulating gas giants, Andrew presented on his struggle with the MineCraft launcher, Patrick talked more on big data, and Chris showed off another CSS Fractal.
read more >
Mar 11, 2014
by chriscauley
This month we talked about cluster computing and harmonic dissonance. Read more hear and even watch a video of the Subharmonic Traumaphone in action.
read more >

Mar 11, 2014
by chriscauley
To celebrate Pi Day, TX/RX Labs will be hosting a Pie Contest. Any one can enter, so read more about it here, bake a pie, and join us on 3/14 for the festivities.
read more >
Oct 20, 2013
by chriscauley
I've been making many changes to the TX/RX website over the last few days. Mostly this involves course evaluations and emailing new members. One fun change is that comments now support mark down. If you want to use mark down in comments just click "Formatting Help" above the comments. Markdown ...
read more >

Oct 13, 2013
by chriscauley
Space Nerds in Space is a multiplayer cooperative space ship bridge simulator made by one of the members of TX/RX. Another member, Jack Younger made this mini documentary about the game. It's highly entertaining and shows off the game quite nicely. We usually play SNiS at TX/RX during the open ...
read more >

Jan 15, 2013
by chriscauley
EDIT: I just saw a google+ post about this meetup, the next one is scheduled for February 10th at 1:30 pm. We don't have presenters yet so let me know if you have something to show off. We hope to see you there! This Sunday TX/RX labs held the first ...
read more >

Jan 15, 2013
by chriscauley
The golden ratio has long fascinated mankind because blah blah blah... And the golden rectangle has aesthetic properties because of yadda yadda yadda... If you don't already know about this magical number, I'm not the person to educate you. Trust me, it's cool. About a year ago I decided to ...
read more >
Dec 25, 2012
by chriscauley
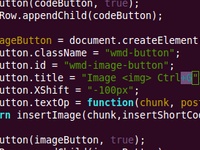
The new TX/RX blog site uses WMD editor, a what-you-see-is-what-you-mean markdown editor. You can use this to add any image, but we have our own image library that we want to pull in images from (so that we can re-use photos elsewhere on the site, coming soon!), so we needed ...
read more >
Stay connected!
Sign up for our monthly newsletter for updates on events, workshops, studio tips + tricks, member spotlights and more.
Sign Me Up!About TXRX Labs
Established in 2008, TXRX Labs is a non-profit hackerspace for the greater Houston area. Housed in the East End District, we offer courses in and access to our rapid prototyping lab, woodshop, machineshop, electronics lab, and a wide variety of other tools. Our goal is to educate the public about technology and show how seemingly complex techniques can be used by anyone. If you like what we do, please donate.
This Week at TXRX Labs
- 04/18 - CNC Router Using VCarve
- 04/19 - Ion Prototyping Lab Office Hours
- 04/19 - Basic Machine Shop Technology - Milling
- 04/20 - Brazing I : Oxy/ Acetylene 101: Heating, Cutting, Brazing
- 04/22 - Office Hours
- 04/22 - Ceramics Boot Camp
- 04/22 - Welding I: MIG
- 04/23 - Ion Prototyping Lab Office Hours
- 04/23 - Laser Cutting I
- 04/23 - Jewelry I: Silver Chain Bracelet
- 04/23 - Woodworking I: Woodshop Tools
- 04/24 - Office Hours
- 04/24 - Jewelry I: Silver Chain Bracelet
- 04/24 - Woodworking I: Woodshop Tools

